AWS IoT Core Custom Authorizer 적용해보자 2부
1부에서 AWS IoT Core Custom Authorizer를 생성하는 방법을 주로 다뤘다.
2024.09.03 - [클라우드] - AWS IoT Core Custom Authorizer 적용해보자 1부
2부에서는 모의기기를 이용해 Custom Authroizer를 이용해 MQTT 토픽에 연결하고 메시지를 수신 받아볼 것이다.
AWS IoT Core Custom Authorizer 적용
목차
1. 모의기기 구현 준비
모의 기기 구현을 위한 준비를 하겠다. 1부에서 언급했듯이 내가 Custom Authorizer를 사용하게 된 것은 모바일 앱에서 API서버에서 발급한 JWT토큰을 이용해 AWS IoT Core의 MQTT 토픽에 전송되는 메시지를 수신 받을 수 있도록 하는 것이었다.
만약 이 전 글들을 따라 진행했다면 Windows 사용자는 WSL2 환경이 구성되어 있을 것이다. 맥북 사용자는 그대로 진행하면 될 것 같다.
파이썬 개발 IDE를 실행해서 프로젝트를 생성한다. 이미 모의기기 구현을 이전 포스트를 따라 진행했다면 모의 기기 파이썬 파일이 있는 프로젝트 폴더에서 새로운 파일만 만들어서 진행해도 된다. 나는 이미 모의기기를 구현했으니 모의 기기가 있는 프로젝트에서 새로운 파일만 만들어서 진행하겠다.

from awsiot import mqtt_connection_builder
import time
import urllib.parse
import base64
from awscrt import io, mqtt


# Custom authorizer 설정
AWS_IOT_CORE_ENDPOINT = "<AWSIoTCore엔드포인트>"
CUSTOM_AUTHORIZER_NAME = "<1부에서 생성한 Custom Authorizer 이름>"
JWT_TOKEN = "JWT토큰"  # JWT 토큰을 입력한다. 현재는 실습이라 토큰을 직접 입력하지만, 실제 서비스에서는 토큰을 안전하게 관리해야 한다.
CLIENT_ID = "demo_client_GoWoong" # MQTT 클라이언트 ID (클라이언트 ID는 고유해야 한다.)
username = "GoWoong"  # MQTT 연결에 사용할 유저명

encoded_authorizer_name = urllib.parse.quote(CUSTOM_AUTHORIZER_NAME, safe='')
username = f"{username}?x-amz-customauthorizer-name={encoded_authorizer_name}"

# MQTT 연결에 사용할 password (JWT 토큰을 base64로 인코딩)
password = base64.b64encode(JWT_TOKEN.encode('utf-8')).decode('utf-8')

# 연결 중단 시 호출되는 콜백 함수
def on_connection_interrupted(connection, error, **kwargs):
    print(f"Connection interrupted. error: {error}")

# 연결이 재개될 때 호출되는 콜백 함수
def on_connection_resumed(connection, return_code, session_present, **kwargs):
    print(f"Connection resumed. return_code: {return_code} session_present: {session_present}")

    if return_code == mqtt.ConnectReturnCode.ACCEPTED and not session_present:
        print("Session did not persist. Resubscribing to existing topics...")
        resubscribe_future, _ = connection.resubscribe_existing_topics()
        resubscribe_future.add_done_callback(on_resubscribe_complete)

def on_resubscribe_complete(resubscribe_future):
    resubscribe_results = resubscribe_future.result()
    print("Resubscribe results: {}".format(resubscribe_results))
    for topic, qos in resubscribe_results['topics']:
        if qos is None:
            sys.exit("Server rejected resubscribe to topic: {}".format(topic))

# MQTT 메시지를 수신할 때 호출되는 콜백 함수
def on_message_received(topic, payload, **kwargs):
    print(f"Received message from topic '{topic}': {payload}")

if __name__ == '__main__':
    # MQTT 연결 생성 (Custom Authorizer 사용)
    event_loop_group = io.EventLoopGroup(1)
    host_resolver = io.DefaultHostResolver(event_loop_group)
    client_bootstrap = io.ClientBootstrap(event_loop_group, host_resolver)

    tls_options = io.TlsContextOptions()
    tls_options.alpn_list = ['mqtt']
    tls_options.override_default_trust_store_from_path(ca_dirpath=None, ca_filepath="AmazonRootCA1.pem")

    tls_ctx = io.ClientTlsContext(options=tls_options)
    client = mqtt.Client(client_bootstrap, tls_ctx)

    # MQTT 연결 생성
    mqtt_connection = mqtt.Connection(
        client=client,
        host_name=AWS_IOT_CORE_ENDPOINT,
        port=443,  # IoT Core의 MQTT 연결용 포트
        on_connection_interrupted=on_connection_interrupted,
        on_connection_resumed=on_connection_resumed,
        client_id=CLIENT_ID,
        clean_session=True,
        keep_alive_secs=30,
        username=username,
        password=password
    )

    print(f"Connecting to {AWS_IOT_CORE_ENDPOINT} with client ID '{CLIENT_ID}'...")
    connect_future = mqtt_connection.connect()
    connect_future.result()  # 연결이 완료될 때까지 대기
    print("Connected!")

    # iot/data 토픽에 구독
    topic = "iot/data"
    print(f"Subscribing to topic '{topic}'...")
    subscribe_future, _ = mqtt_connection.subscribe(
        topic=topic,
        qos=mqtt.QoS.AT_LEAST_ONCE,
        callback=on_message_received
    )
    subscribe_future.result()  # 구독이 완료될 때까지 대기
    print(f"Subscribed to '{topic}'.")

    # 메시지 수신 대기
    try:
        while True:
            time.sleep(1)
    except KeyboardInterrupt:
        pass

    # Disconnect
    print("Disconnecting...")
    disconnect_future = mqtt_connection.disconnect()
    disconnect_future.result()
    print("Disconnected!")
생성한 python 파일에 코드를 붙여넣으면 된다.
AWS_IOT_CORE_ENDPOINT, CUSTOM_AUTHORIZER_NAME, JWT_TOKEN, CLIENT_ID, username을 각자에 맞게 수정해야 한다.
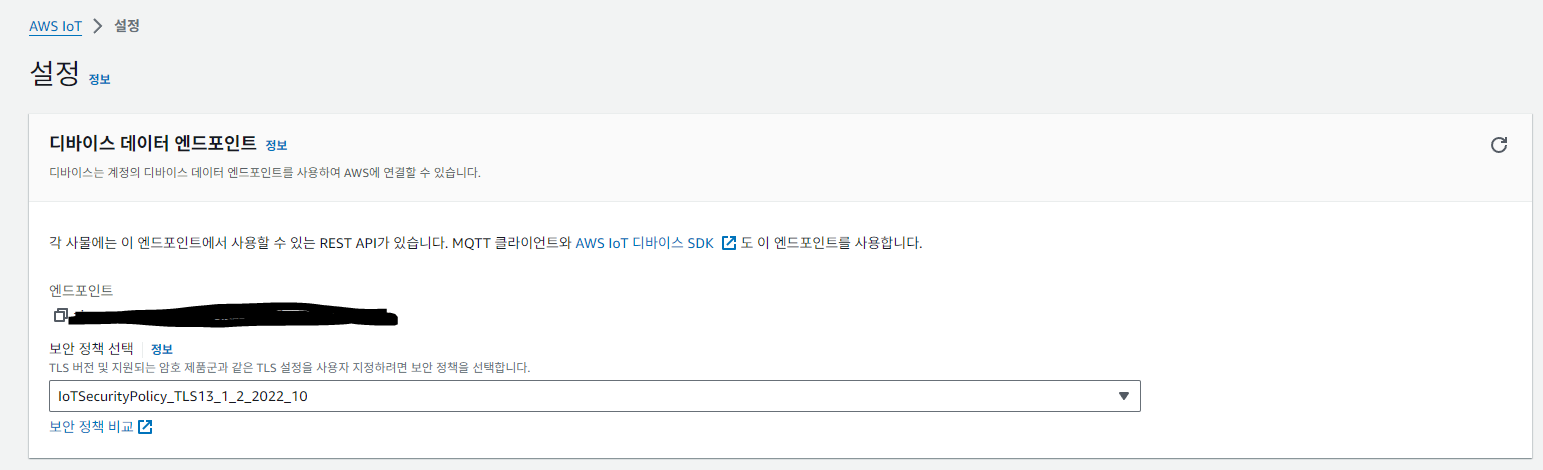
AWS IoT Core 엔드포인트는 AWS IoT Core 콘솔에 설정에서 확인할 수 있다.
CUSTOM_AUTHORIZER_NAME은 1부에서 생성한 Custom Authorizer의 이름을 입력한다.
JWT_TOKEN 은 이번 실습에서 구현 하는 코드는 일종의 모바일 앱 클라이언트라 가정을 하겠다. 그리고 이 모바일 앱은 API 서버로 부터 로그인을 하고 access_token이라는 JWT 토큰을 받는다 이 토큰을 사용할 것이다.
CLIENT_ID는 고유한 클라이언트 이름이다. 실습에서는 그냥 하드코딩으로 지정하겠지만 실무에서는 사용자의 고유한 값을 사용하여 식별이 되도록 설정해도 될 것이다.
username도 하드코딩으로 임의로 지정하겠다. 실무에서는 식별가능한 실제 사용자 이름으로 설정하거나 고유한 값으로 설정할 것같다.
2. 코드 설명

AWS IoT Core 개발자 가이드를 보면 다음과 같은 내용이 있다. MQTT 메시지의 username과 password 필드를 이용해 자격 증명을 전달할 수 있다. username 값에는 토큰 키 이름, 서명 및 권한 부여자 이름을 선택적으로 포함할 수 있다고 한다.
password 필드의 데이터는 base64로 인코딩 되어야 한다고 한다. 그리고 이 후 디코딩은 람다에서 한다고 한다. 1부에서 나는 Lambda함수에서 password로 들어온 데이터를 base64로 디코딩하도록 작성했고 위의 모의기기 코드에서도 password를 base64로 인코딩하도록 작성했다.
username?x-amz-customauthorizer-name=authorizer-name&x-amz-customauthorizer-signature=token-signature&token-key-name=token-value
username = f"{username}?x-amz-customauthorizer-name={encoded_authorizer_name}"이러한 이유로 username이라는 값뒤에 x-amx-customauthorizer-name으로 내가 생성한 custom authorizer name을 설정했다. 이 코드에서는 url 상에 담겨 전달되는 것이기에 urllib.parse.quote 를 사용해 인코딩하였다.
password = base64.b64encode(JWT_TOKEN.encode('utf-8')).decode('utf-8')password는 base64로 인코딩한다.
# 연결 중단 시 호출되는 콜백 함수
def on_connection_interrupted(connection, error, **kwargs):
    print(f"Connection interrupted. error: {error}")

# 연결이 재개될 때 호출되는 콜백 함수
def on_connection_resumed(connection, return_code, session_present, **kwargs):
    print(f"Connection resumed. return_code: {return_code} session_present: {session_present}")

    if return_code == mqtt.ConnectReturnCode.ACCEPTED and not session_present:
        print("Session did not persist. Resubscribing to existing topics...")
        resubscribe_future, _ = connection.resubscribe_existing_topics()
        resubscribe_future.add_done_callback(on_resubscribe_complete)

def on_resubscribe_complete(resubscribe_future):
    resubscribe_results = resubscribe_future.result()
    print("Resubscribe results: {}".format(resubscribe_results))
    for topic, qos in resubscribe_results['topics']:
        if qos is None:
            sys.exit("Server rejected resubscribe to topic: {}".format(topic))

# MQTT 메시지를 수신할 때 호출되는 콜백 함수
def on_message_received(topic, payload, **kwargs):
    print(f"Received message from topic '{topic}': {payload}")
이 코드는 MQTT 연결에 대한 결과를 출력할 콜백함수들을 정의하였다.
if __name__ == '__main__':
    # MQTT 연결 생성 (Custom Authorizer 사용)
    event_loop_group = io.EventLoopGroup(1)
    host_resolver = io.DefaultHostResolver(event_loop_group)
    client_bootstrap = io.ClientBootstrap(event_loop_group, host_resolver)

    tls_options = io.TlsContextOptions()
    tls_options.alpn_list = ['mqtt']
    tls_options.override_default_trust_store_from_path(ca_dirpath=None, ca_filepath="AmazonRootCA1.pem")

    tls_ctx = io.ClientTlsContext(options=tls_options)
    client = mqtt.Client(client_bootstrap, tls_ctx)

    # MQTT 연결 생성
    mqtt_connection = mqtt.Connection(
        client=client,
        host_name=AWS_IOT_CORE_ENDPOINT,
        port=443,  # IoT Core의 MQTT 연결용 포트
        on_connection_interrupted=on_connection_interrupted,
        on_connection_resumed=on_connection_resumed,
        client_id=CLIENT_ID,
        clean_session=True,
        keep_alive_secs=30,
        username=username,
        password=password
    )
main문을 작성하겠다.

위에서 소개한 AWS IoT Core의 개발자 가이드에 보면 MQTT 연결하는 장치의 포트를 443 즉 TLS 를 이용한 연결을 수행해야 하며 ALPN을 mqtt 로 설정해야 한다고 합니다. 그리고 이어서 잠재적 오류를 방지하기 위해 x-amx-customauthorizer-ame 값을 URL 인코딩 하는 것을 적극 권장한다는 것이었다. 그래거 위의 코드들이 이런 사항들을 준수하도록 작성이 된것이다.
내가 모바일 앱 개발자가 아니라서 모바일 앱이 TLS 연결을 어떻게 수행하는 지 모르지만 지금 우리가 만드는 모의기기에서 TLS 설정을 위해서 AmazonRootCA1.pem 파일을 사용할 것이다. AWS에서 공개하는 인증파일을 다운 받아서 진행하면 된다.

https://docs.aws.amazon.com/ko_kr/iot/latest/developerguide/iot-dc-prepare-device-test.html
3단계: 디바이스 테스트 및 Amazon CA 인증서 저장 - AWS IoT Core
이제 AWS 계정 자격 증명이 Raspberry Pi의 microSD 카드에 저장됩니다. 이렇게 하면 나중에 AWS와의 상호 작용이 쉬워지고 이 튜토리얼에서 생성할 소프트웨어도 기본적으로 이 단계 이후에 생성하는
docs.aws.amazon.com
위의 AWS IoT Core 개발자 안내서에서 AmazonRootCA1.pem 파일을 다운받을 수 있다.
# MQTT 연결 생성
mqtt_connection = mqtt.Connection(
    client=client,
    host_name=AWS_IOT_CORE_ENDPOINT,
    port=443,  # IoT Core의 MQTT 연결용 포트
    on_connection_interrupted=on_connection_interrupted,
    on_connection_resumed=on_connection_resumed,
    client_id=CLIENT_ID,
    clean_session=True,
    keep_alive_secs=30,
    username=username,
    password=password
)
MQTT 연결을 위해 aws-iot-device-sdk-python-v2 를 사용할 것이다.
https://github.com/aws/aws-iot-device-sdk-python-v2
GitHub - aws/aws-iot-device-sdk-python-v2: Next generation AWS IoT Client SDK for Python using the AWS Common Runtime
Next generation AWS IoT Client SDK for Python using the AWS Common Runtime - aws/aws-iot-device-sdk-python-v2
github.com
AWS IoT Python SDK GitHub을 보면 샘플 코드가 있고 그 중 custom authroizer의 예시 코드도 있지만 mqtt.Connection을 이용한 연결도 가능하기에 위 코드를 이용해 연결을 계속 진행하겠다.
중요한 값들을 살펴보자면
- client : TLS 설정을 한 client 정보를 이용한다.
- host_name: IoT Core 엔드포인트이다.
- port : 443 포트를 사용하라고 하니 443으로 지정한다.
- client_id : 입력했던 고유한 값
- username : 연결할 custom authorizer 정보를 포함한 username 필드 값
- password : base64로 인코딩된 jwt 토큰 정보이다.
print(f"Connecting to {AWS_IOT_CORE_ENDPOINT} with client ID '{CLIENT_ID}'...")
connect_future = mqtt_connection.connect()
connect_future.result()  # 연결이 완료될 때까지 대기
print("Connected!")

# iot/data 토픽에 구독
topic = "iot/data"
print(f"Subscribing to topic '{topic}'...")
subscribe_future, _ = mqtt_connection.subscribe(
    topic=topic,
    qos=mqtt.QoS.AT_LEAST_ONCE,
    callback=on_message_received
)
subscribe_future.result()  # 구독이 완료될 때까지 대기
print(f"Subscribed to '{topic}'.")

# 메시지 수신 대기
try:
    while True:
        time.sleep(1)
except KeyboardInterrupt:
    pass

# Disconnect
print("Disconnecting...")
disconnect_future = mqtt_connection.disconnect()
disconnect_future.result()
print("Disconnected!")
이제 생성한 mqtt_connection을 이용해 IoT Core에 연결을 진행하고 연결이 되면 IoT 기기가 센서 데이터를 보내고 있는 토픽을 구독한다.
이 후 메시지 수신을 대기하면서 데이터가 수신되면 on_message_received 콜백이 실행되며 터미널에 IoT 기기가 보낸 데이터가 표시된다.
3. 실행결과 확인
실행 결과를 확인해 보겠다. 먼저 생성했던 모의기기를 실행한다.

이 후 위에서 작성한 클라이언트 모의 기기 코드를 실행한다. 물론 그 전에 만약 jwt 토큰이 만료 되었을 수 있으니 API 서버로 로그인 요청을 보낸 뒤 access_token을 새로 받겠다.

이게 우리가 작성한 클라이언트 모의 기기의 실행 결과이다. 순서대로 보면
Connected!가 되며 연결이 되었다.
Subscribing to topic 'basestation/sensor/data'...
Subscribed to 'basestation/sensor/data'.
다음으로 IoT 기기에서 메시지를 보내는 토픽을 구독하겠다는 메시지가 출력된다. 위 출력 값이 다를 수는 있는데 편의를 위해 토픽 이름만 다르게 설정했었다.
Received message from topic 'basestation/sensor/data': b'{"device_id": 1, "user_id": 1, "temperature": -1, "humidity": 55, "noise": 52, "light": 175, "TimeStamp": 1725329423}'
Received message from topic 'basestation/sensor/data': b'{"device_id": 1, "user_id": 1, "temperature": 46, "humidity": 53, "noise": 63, "light": 721, "TimeStamp": 1725329428}'
Received message from topic 'basestation/sensor/data': b'{"device_id": 1, "user_id": 1, "temperature": 47, "humidity": 88, "noise": 37, "light": 891, "TimeStamp": 1725329433}'
Received message from topic 'basestation/sensor/data': b'{"device_id": 1, "user_id": 1, "temperature": -7, "humidity": 66, "noise": 57, "light": 768, "TimeStamp": 1725329438}'
Received message from topic 'basestation/sensor/data': b'{"device_id": 1, "user_id": 1, "temperature": 5, "humidity": 45, "noise": 76, "light": 841, "TimeStamp": 1725329443}'
Received message from topic 'basestation/sensor/data': b'{"device_id": 1, "user_id": 1, "temperature": -2, "humidity": 14, "noise": 56, "light": 559, "TimeStamp": 1725329448}'
Received message from topic 'basestation/sensor/data': b'{"device_id": 1, "user_id": 1, "temperature": 34, "humidity": 71, "noise": 34, "light": 11, "TimeStamp": 1725329453}'
Received message from topic 'basestation/sensor/data': b'{"device_id": 1, "user_id": 1, "temperature": 25, "humidity": 36, "noise": 74, "light": 712, "TimeStamp": 1725329458}'
Received message from topic 'basestation/sensor/data': b'{"device_id": 1, "user_id": 1, "temperature": 37, "humidity": 19, "noise": 70, "light": 319, "TimeStamp": 1725329463}'
Received message from topic 'basestation/sensor/data': b'{"device_id": 1, "user_id": 1, "temperature": 40, "humidity": 66, "noise": 48, "light": 470, "TimeStamp": 1725329468}'
Received message from topic 'basestation/sensor/data': b'{"device_id": 1, "user_id": 1, "temperature": 5, "humidity": 34, "noise": 78, "light": 664, "TimeStamp": 1725329473}'
이 후 이런 Received message 라는 IoT 기기가 토픽에 보내는 메시지가 5초마다 클라이언트 모의 기기의 실행 터미널에 표시되는 것을 볼 수 있다.
AWS Cloud Watch에서도 확인을 하겠다.
AWS Cloud Watch 콘솔에 들어가 로그 그룹을 선택한다. 이 후 /aws/lambda/aws-iot-core-custom-authorizer라는 로그 그룹을 선택하고 가장 최신 스트림을 열어본다.
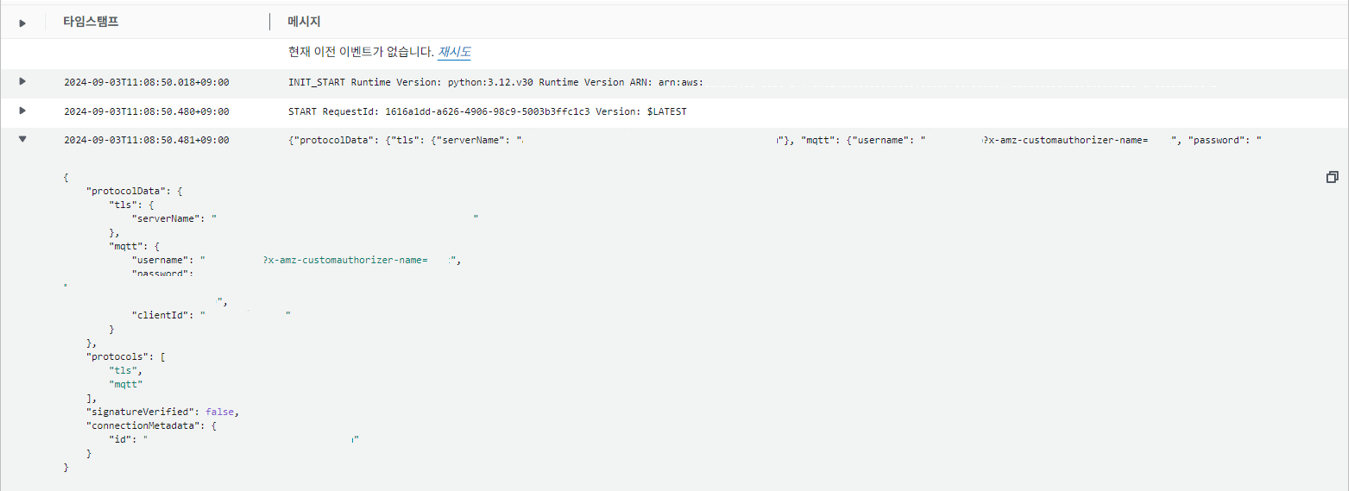
AWS Custom Authroizer Lambda 함수에 위와 같은 데이터가 이벤트 입력으로 들어왔고 SECRET_KEY 검증을 진행해서

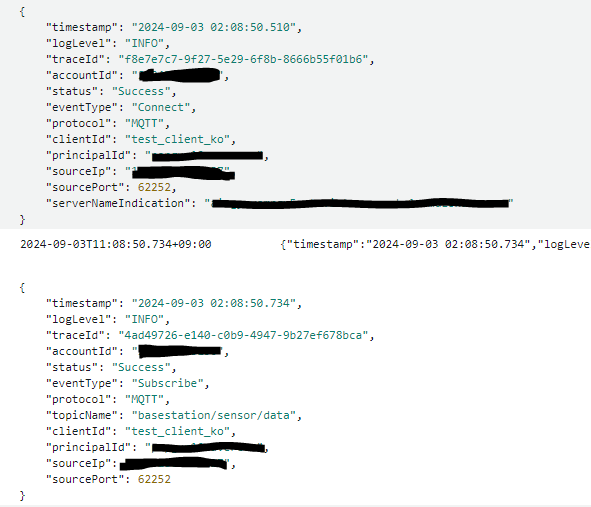
AWS IoT Core로 해당 사용자에 대한 정책을 추가하여 연결을 허용하게 된다. 다음으로는 AWS IoT Core의 로그도 확인하겠다.
💡 IoT Core의 로그를 확인하기 위해서는 IoT Core의 로깅 옵션이 활성화 되어 있어야 한다.
로그 그룹에서 AWSIoTLogsV2 로그 그룹을 선택해서 확인할 수 있다.
4. 정리
지금까지 1부와 2부로 나눠서 AWS IoT Core Custom Authorizer에 대해서 소개 및 실습을 진행했다. 이 후 모바일 앱에서 실제로 구현을 거쳐 정상적으로 실행되는지 테스트를 해보지는 않았지만 AWS Custom Authorizer를 이용해 X.509 인증서를 사용하지 않고도 AWS IoT Core MQTT 토픽에 연결을 할 수 있다는 것을 확인 할 수 있었다.
추천글
AWS IoT Core 개발자 안내서 : https://docs.aws.amazon.com/ko_kr/iot/latest/developerguide/config-custom-auth.html